基本信息
服务器IP:192.168.0.31
集群节点:19200/19300,29200/29300,39200/39300
1)调高JVM线程数限制数量
注:这一步是为了防止启动容器时,报出如下错误: bootstrap checks failed max virtual memory areas vm.max_map_count [65530] likely too low, increase to at least [262144]
vi /etc/sysctl.conf

# 编辑 sysctl.conf, 加入以下内容
vm.max_map_count=262144

# 启用配置
sysctl -p
2)创建目录
# 找一个文件夹作为根目录
cd /houder

# 创建文件夹
mkdir -p elasticsearch/node{1..3}/{config,data,logs}

# 查看目录结构
[root@bogon houder]# tree
.
└── elasticsearch
    ├── node1
    │   ├── config
    │   ├── data
    │   └── logs
    ├── node2
    │   ├── config
    │   ├── data
    │   └── logs
    └── node3
        ├── config
        ├── data
        └── logs

13 directories, 0 files
3)创建配置文件
vi elasticsearch/node1/config/elasticsearch.yml

cluster.name: elasticsearch-cluster
node.name: es-node1
network.bind_host: 0.0.0.0
network.publish_host: 192.168.0.31
http.port: 19200
transport.tcp.port: 19300
http.cors.enabled: true
http.cors.allow-origin: "*"
node.master: true
node.data: true
discovery.seed_hosts: ["192.168.0.31:19300", "192.168.0.31:29300", "192.168.0.31:39300"]
cluster.initial_master_nodes: ["es-node1"]
vi elasticsearch/node2/config/elasticsearch.yml
cluster.name: elasticsearch-cluster
node.name: es-node2
network.bind_host: 0.0.0.0
network.publish_host: 192.168.0.31
http.port: 29200
transport.tcp.port: 29300
http.cors.enabled: true
http.cors.allow-origin: "*"
node.master: true
node.data: true
discovery.seed_hosts: ["192.168.0.31:19300", "192.168.0.31:29300", "192.168.0.31:39300"]
cluster.initial_master_nodes: ["es-node1"]vi elasticsearch/node3/config/elasticsearch.yml
cluster.name: elasticsearch-cluster
node.name: es-node3
network.bind_host: 0.0.0.0
network.publish_host: 192.168.0.31
http.port: 39200
transport.tcp.port: 39300
http.cors.enabled: true
http.cors.allow-origin: "*"
node.master: true
node.data: true
discovery.seed_hosts: ["192.168.0.31:19300", "192.168.0.31:29300", "192.168.0.31:39300"]
cluster.initial_master_nodes: ["es-node1"]
4)授权
chmod -R 777 elasticsearch5)启动节点
docker run -d --name es-node1 --restart=always \
-p 19200:19200 -p 19300:19300 \
-e ES_JAVA_OPTS="-Xms1024m -Xmx1024m" \
-v /houder/elasticsearch/node1/config/elasticsearch.yml:/usr/share/elasticsearch/config/elasticsearch.yml \
-v /houder/elasticsearch/node1/data:/usr/share/elasticsearch/data \
-v /houder/elasticsearch/node1/logs:/usr/share/elasticsearch/logs \
-v /etc/localtime:/etc/localtime \
elasticsearch:7.17.10
docker run -d --name es-node2 --restart=always \
-p 29200:29200 -p 29300:29300 \
-e ES_JAVA_OPTS="-Xms1024m -Xmx1024m" \
-v /houder/elasticsearch/node2/config/elasticsearch.yml:/usr/share/elasticsearch/config/elasticsearch.yml \
-v /houder/elasticsearch/node2/data:/usr/share/elasticsearch/data \
-v /houder/elasticsearch/node2/logs:/usr/share/elasticsearch/logs \
-v /etc/localtime:/etc/localtime \
elasticsearch:7.17.10docker run -d --name es-node3 --restart=always \
-p 39200:39200 -p 39300:39300 \
-e ES_JAVA_OPTS="-Xms1024m -Xmx1024m" \
-v /houder/elasticsearch/node3/config/elasticsearch.yml:/usr/share/elasticsearch/config/elasticsearch.yml \
-v /houder/elasticsearch/node3/data:/usr/share/elasticsearch/data \
-v /houder/elasticsearch/node3/logs:/usr/share/elasticsearch/logs \
-v /etc/localtime:/etc/localtime \
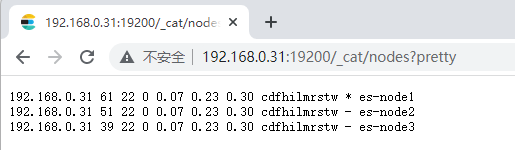
elasticsearch:7.17.106)验证
在浏览器地址栏访问 http://192.168.0.31:19200/_cat/nodes?pretty 查看节点状态